Persistent Volumes
At this point, our services can talk to each other. Very nice.
But our database still has a major weakness: its data is living inside the container’s writable layer.
Each time we removed the container, the data went with it.
The Problem
Section titled “The Problem”So far, our MongoDB service has looked something like this:
services:  api_service:    build: .    ports:      - '3000:3000'    environment:      - MONGO_URI=${MONGO_URI}
  db_service:    image: mongo:8.0
This works, but it means the database container is carrying its own data around inside itself.
That is fine for a quick experiment.
It is terrible for persistence.
The Goal
Section titled “The Goal”We want the MongoDB container to be replaceable without losing the actual database files.
To do that, we give Docker a separate place to store that data: a named volume.
A named volume lives outside the container itself, so even if the container is removed and recreated, the data can still be there waiting for it.
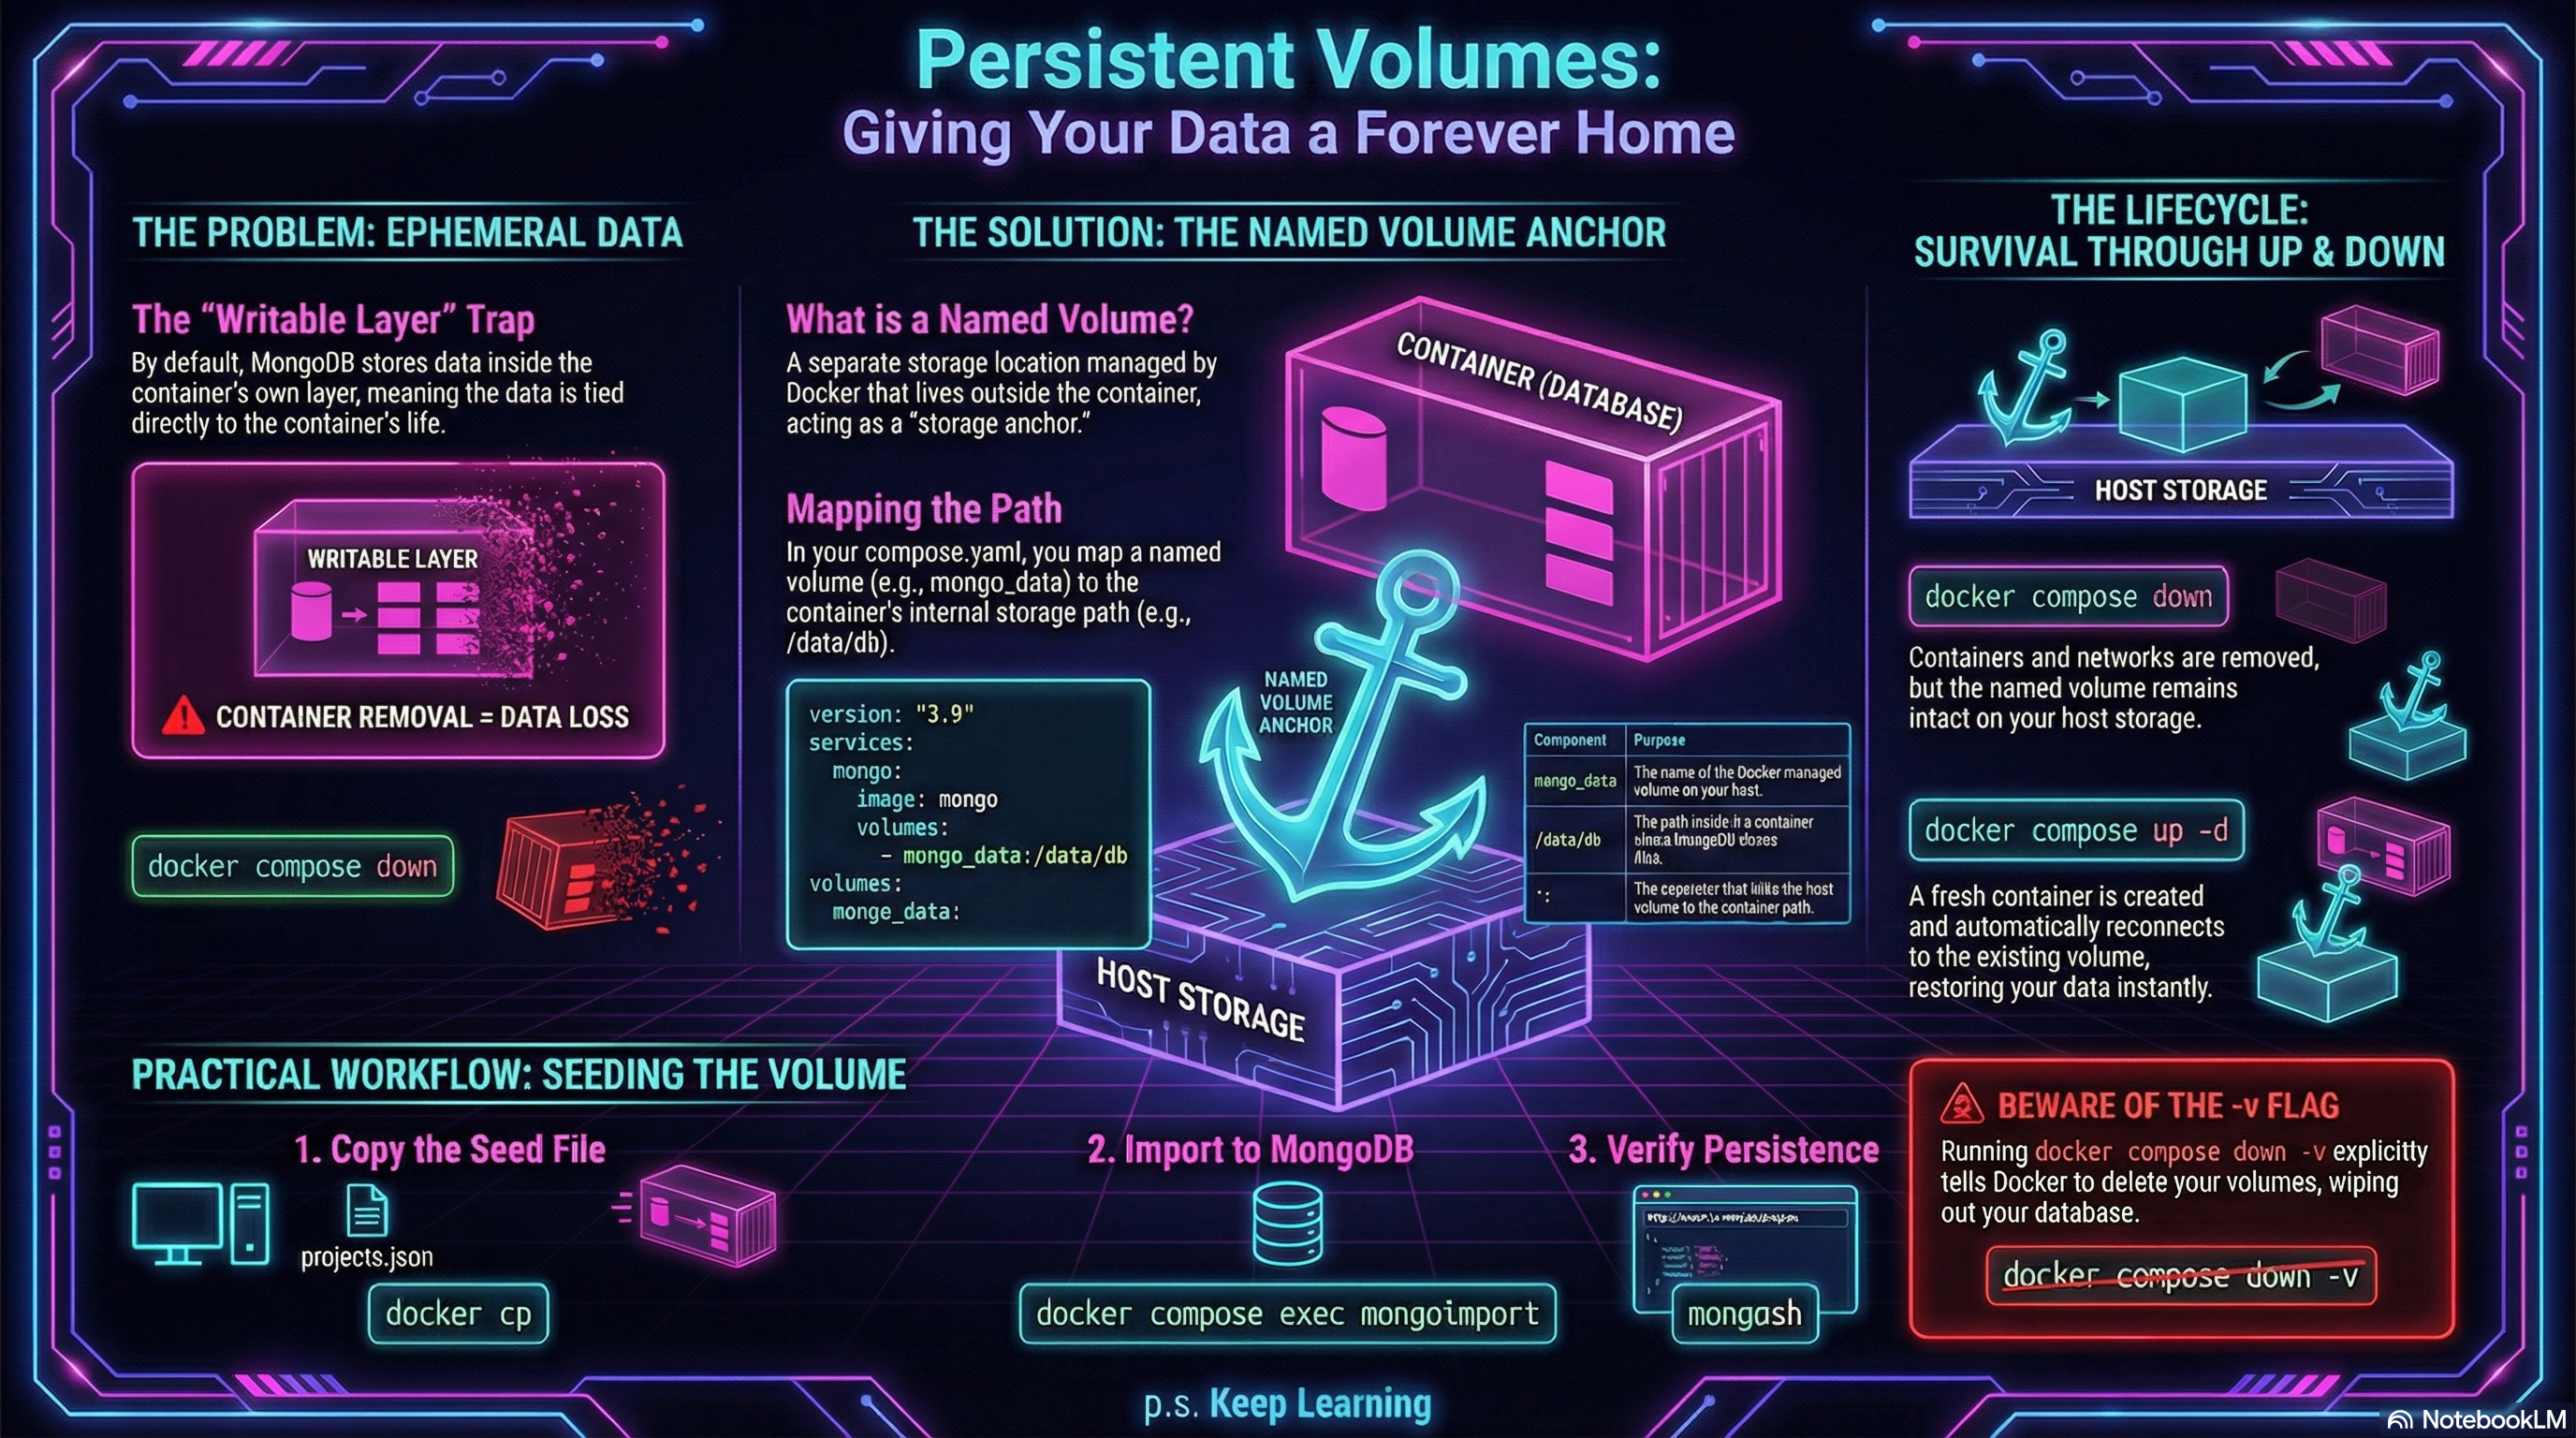
Figure 1: Keeping Data Alive with Named Volumes
Updating compose.yaml
Section titled “Updating compose.yaml”Add a volumes section to the MongoDB service, and define the named volume at the bottom of the file:
services:  api_service:    build: .    ports:      - '3000:3000'    environment:      - MONGO_URI=${MONGO_URI}
  db_service:    image: mongo:8.0    volumes:      - mongo_data:/data/db
volumes:  mongo_data:
Breaking Down the Volume Mapping
Section titled “Breaking Down the Volume Mapping”This line does the important work:
- mongo_data:/data/dbIt means:
mongo_datais the name of the Docker-managed volume/data/dbis the path inside the MongoDB container where MongoDB stores its database files
So instead of storing its data only inside the container’s writable layer, MongoDB now stores it in a separate Docker volume mounted at the place it expects.
Containers are easy to destroy and recreate.
A named volume gives important data a place to live that is not tied to the life of one specific container.
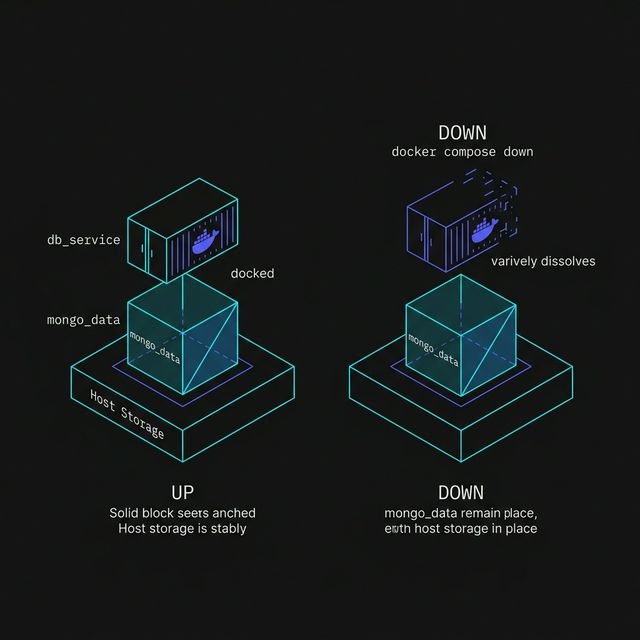
Figure 1: The Volume Anchor. Containers are designed to be ephemeral (temporary), but volumes are designed for persistence. By decoupling the status of the database files from the life of the container, we ensure that data survives a ‘down’ and ‘up’ cycle.
Why This Matters
Section titled “Why This Matters”Without a volume, this kind of reset is bad news:
docker compose downdocker compose up -dOur container comes back.
Our data may not.
With a named volume in place, the container can come and go, while the database files stay behind in mongo_data.
That is a much healthier setup.
Rebuilding the Stack
Section titled “Rebuilding the Stack”Once we add the volume to compose.yaml, bring the stack down and back up:
docker compose downdocker compose up -dCompose will create the named volume automatically if it does not already exist.
After that, MongoDB will begin storing its data there.
Checking That the Volume Exists
Section titled “Checking That the Volume Exists”We can list Docker volumes with:
docker volume lsWe should see a volume related to our project, typically including the name mongo_data.
Depending on the project name Compose uses, the full volume name may be prefixed automatically.
That is normal.
A Very Important Detail
Section titled “A Very Important Detail”docker compose down removes containers and networks.
It does not remove named volumes unless we explicitly ask it to.
That is exactly why volumes are useful here.
If we run:
docker compose down -v
Compose will remove the named volumes too.
That means our database data will be deleted along with the containers.
Let’s use that flag carefully.
Seeding the Database with Compose in Place
Section titled “Seeding the Database with Compose in Place”Earlier in the lesson, we seeded MongoDB by working directly with a manually started db_service container.
Now that Docker Compose is managing the stack and MongoDB has a named volume, this is a much better time to load real data.
Step 1: Make Sure the Stack Is Running
Section titled “Step 1: Make Sure the Stack Is Running”Start the stack if it is not already running:
docker compose up -dThat gives us a running db_service container managed by Compose.
Step 2: Copy the Seed File into the Container
Section titled “Step 2: Copy the Seed File into the Container”We have our seed file projects.json, copy it into the running database container like this:
docker cp projects.json $(docker compose ps -q db_service):/projects.jsonThis places the file at /projects.json inside the MongoDB container.
docker compose exec can target a service name like db_service.
But docker cp works with a container, not a Compose service name.
The $(docker compose ps -q db_service) part asks Compose for the actual
container ID of the running db_service, then passes that to docker cp.
Step 3: Import the Data
Section titled “Step 3: Import the Data”Now run mongoimport inside the database service:
docker compose exec db_service mongoimport \ --db portfolio \ --collection projects \ --file /projects.json \ --jsonArrayThis imports the documents from projects.json into the projects collection in the portfolio database.
Step 4: Verify the Data
Section titled “Step 4: Verify the Data”With our services running, we can now verify the data.
Open your browser and navigate to:
http://localhost:3000/api/projects
You should see the three projects we seeded.
You can also confirm the import by opening mongosh inside the database service:
docker compose exec db_service mongoshThen run:
use portfoliodb.projects.find()If everything worked, we should now see your seeded project data.
Why This Works Better Now
Section titled “Why This Works Better Now”Before we added a named volume, imported data lived only inside the container.
That meant removing the container could wipe out the database contents.
Now that MongoDB is storing its files in mongo_data, the data can survive a normal Compose teardown and restart:
docker compose downdocker compose up -dThat makes seeding much more worthwhile.
A normal docker compose down keeps named volumes.
But docker compose down -v removes them, which means your seeded MongoDB
data will be deleted too.
The Real Lesson Here
Section titled “The Real Lesson Here”A container is not the right long-term home for stateful data.
For services like MongoDB, we want the container to be disposable but the data to persist.
That is what the named volume gives us:
- container lifecycle freedom
- more realistic database behavior
- less accidental sadness
Very worth it.
In this lesson, we used a named volume because it is simple and portable.
Docker can also mount a specific folder from your computer into a container. That is called a bind mount, and it is often useful for local development.
We are keeping that out of the main workflow for now because host-path mounts introduce more platform-specific quirks than we need for this lesson.
Extra Bits & Bytes
Section titled “Extra Bits & Bytes”Docker Volumes
⏭ Workflow and Debugging
Section titled “⏭ Workflow and Debugging”Now that the stack is more realistic, let’s look at the day-to-day workflow for inspecting containers, reading logs, and figuring out what went sideways when something breaks.