Copy and Seed
Our database service is running, and we already proved that we can connect to it with mongosh.
Now we want to load it with a small starter dataset.
Not because we need a seeding lesson — we already know that idea — but because our database now lives inside a container, so we need a way to get the seed file in and import it.
Our Goal
Section titled “Our Goal”We want to take a local file such as projects.json, copy it into the container, and then import it into MongoDB.
That gives us a seeded projects collection inside our portfolio database.
The Seed File
Section titled “The Seed File”Here is a small example of what projects.json might look like:
[ { "title": "Professor Solo Portfolio", "slug": "professor-solo-portfolio", "category": "web-development", "featured": true }, { "title": "Node Expense Tracker", "slug": "node-expense-tracker", "category": "backend", "featured": false }, { "title": "DevOps Course Site", "slug": "devops-course-site", "category": "teaching", "featured": true }]For this lesson, the content of the file is not the interesting part.
The interesting part is getting that file into the container and loading it into the database.
Copying the File into the Container
Section titled “Copying the File into the Container”We will use docker cp to copy the seed file from our machine into the running container:
docker cp projects.json db_service:/projects.jsonBreaking Down docker cp
Section titled “Breaking Down docker cp”docker cpcopies files between your machine and a containerprojects.jsonis the local file on our machinedb_service:/projects.jsonmeans “copy this file into thedb_servicecontainer at the root level”
After this command runs, the container will have a file at /projects.json.
At this stage, docker cp is a nice simple option because it lets us move one
file into the container without needing bind mounts or Compose volumes yet.
It is not the most automated workflow in the world, but it is great for understanding what is happening.
Importing the Seed Data
Section titled “Importing the Seed Data”Now that the file exists inside the container, we can run mongoimport against it:
docker exec -it db_service mongoimport \ --db portfolio \ --collection projects \ --file /projects.json \ --jsonArrayBreaking Down the Import Command
Section titled “Breaking Down the Import Command”docker exec -itruns a command inside the running containerdb_serviceis the MongoDB containermongoimportis the MongoDB import tool--db portfoliotargets theportfoliodatabase--collection projectstargets theprojectscollection--file /projects.jsontells MongoDB where the file is inside the container--jsonArraytells MongoDB that the file contains a JSON array of documents
That imports all of the documents from the seed file into the projects collection.
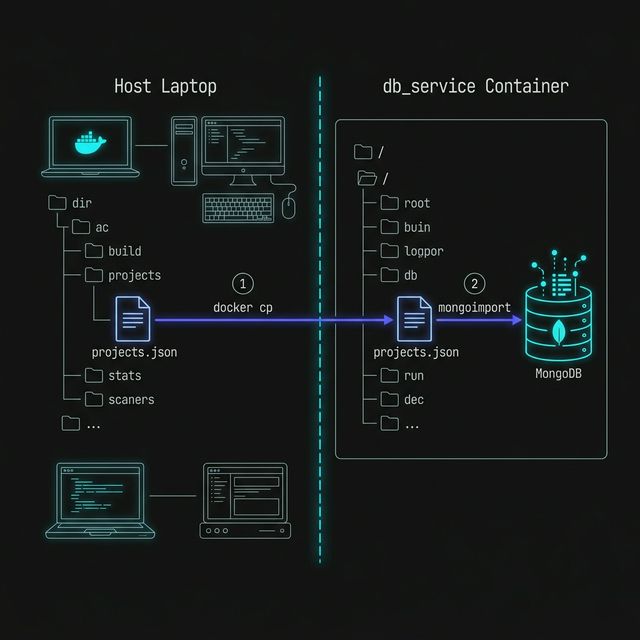
Figure 1: The two-stage seeding process: first crossing the container boundary with ‘docker cp’, then loading the file into MongoDB with ‘mongoimport’.
Verifying the Import
Section titled “Verifying the Import”Now let’s confirm that the data is really there.
Open mongosh again:
docker exec -it db_service mongoshSwitch to the database:
use portfolioThen query the collection:
db.projects.find();We can also count the documents:
db.projects.countDocuments();That gives us a quick sanity check that the import worked.
Why This Is Useful
Section titled “Why This Is Useful”Once a database runs in a container, even familiar tasks like seeding start to look a little different.
The database is no longer just “on our machine” in the vague general sense.
It is running in an isolated environment, so we need container-aware commands to work with it:
docker cpto move files indocker execto run commands insidemongoimportto load data into MongoDB
We can seed the container, but the data is still living inside the container’s writable layer.
If the container is removed, the imported data disappears too.
Seeding gives us content. A volume gives us persistence.
Extra Bits & Bytes
Section titled “Extra Bits & Bytes”Docker CP Reference
Mongoimport Documentation