Step Inside
Our MongoDB container is running, but we have not actually used it yet.
Before we move on to seeding, we want to step inside the container, connect with mongosh, and create a first real document.
Why This Matters
Section titled “Why This Matters”A running container is nice, but we want proof that MongoDB is actually working.
In this step, we will:
- use
docker execto run a command inside the container - connect to MongoDB with
mongosh - create a database named
portfolio - create a
projectscollection by inserting a first document - confirm that the document exists
That gives us a clean little win before we move into more automated setup.
A Quick Detour: docker exec
Section titled “A Quick Detour: docker exec”The docker exec command lets us run a command inside a container that is already running.
That makes it incredibly handy for things like:
- opening a shell inside a container
- running database tools
- checking files and folders
- debugging what is happening inside a service
In our case, we are using it to launch the MongoDB shell from inside the MongoDB container.
docker exec -it db_service mongoshBreaking Down the Command
Section titled “Breaking Down the Command”docker execruns a command inside an already running container-itkeeps the session interactive so we can type commandsdb_serviceis the name of the running MongoDB containermongoshlaunches the MongoDB shell inside that container
If all goes well, we should end up at a MongoDB prompt.
We did not publish port 27017 to the host machine, so this database is not
meant to be accessed directly from our laptop tools yet.
For now, stepping inside the container is the simplest and clearest approach.
Creating the portfolio Database
Section titled “Creating the portfolio Database”Inside mongosh, switch to a database named portfolio:
use portfolioMongoDB creates databases lazily, which means the database will not really exist until it contains data.
So right now, we have selected the database name, but we have not actually stored anything yet.
Creating the First Collection and Document
Section titled “Creating the First Collection and Document”Now let’s insert one document into a projects collection:
db.projects.insertOne({ title: "Professor Solo Portfolio", slug: "professor-solo-portfolio", category: "web-development", featured: true,});A few neat things happen here:
- if the
projectscollection does not exist yet, MongoDB creates it - if the
portfoliodatabase does not exist yet, MongoDB creates it - the inserted object becomes the first document in that collection
Very chill. Very MongoDB.
Confirming That It Worked
Section titled “Confirming That It Worked”Now let’s check whether the document is there:
db.projects.find();We should see the document we just inserted.
We can also check which collections exist in the current database:
show collectionsAnd if we want to confirm our current database:
db;What We Just Proved
Section titled “What We Just Proved”With only a few commands, we confirmed that:
- the container is running
- MongoDB accepts connections
- the
portfoliodatabase can be used - the
projectscollection now exists - data can be written and queried successfully
That is a proper first checkpoint.
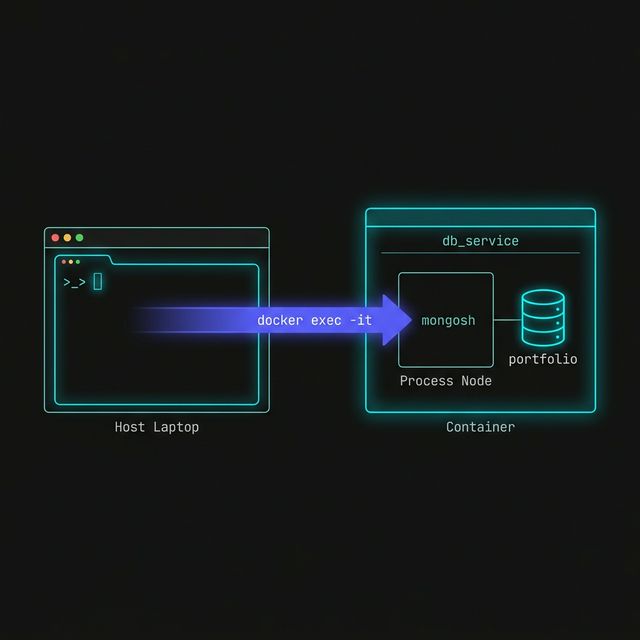
Figure 1: A technical schematic showing a ‘Laptop’ terminal opening a secure ‘docker exec’ tunnel into the ‘db_service’ container to run the ‘mongosh’ process internally.
We have not attached a named volume yet.
That means this document currently lives only inside the container’s writable layer. If the container is removed, the data goes with it.
Extra Bits & Bytes
Section titled “Extra Bits & Bytes”Docker Exec Reference